title: Set up built-in authentication for Azure Static Web App
date: 2023-05-02 22:15:00 +0200 CEST
draft: false
author: John Roos
----
This is the second part in a series covering Azure Static Web Apps. In the previous post I showed how to deploy a static web app. The web app was deployed successfully and open to the public to visit. What if you want to restrict access to the app to just a few users you trust? Azure Static Web Apps offers a couple of solutions without having to write a lot of code.
You can add authentication in two ways: built-in authentication and custom authentication. In this post I will focus on the built-in authentication. This is also the only way that works if you are running the free tier. Custom authentication requires the standard tier. I will go through custom authentication in a future post.
The baseline
I will continue on the site I deployed in the previous post. The site contained one html file which was located in the StaticWebApp folder. The deployment pipeline was configured to deploy anything in that folder. I will continue from there.
Configuration file
Its remarkably simple to add built-in authentication to a static web app. In the web app folder (in this case the StaticWebApp folder), add a file called staticwebapp.config.json and add the following content:
// staticwebapp.config.json
{
  "routes": [
    {
      "route": "/*",
      "allowedRoles": ["authenticated"]
    }
  ]
}
That’s it. Now let the pipeline will deploy the change and suddenly your site is protected with authentication. However, this configuration does not give the user the option to actually sign in. You could ask users to browse to https://yousite.com/.auth/login/aad and authenticate and then go back to the main site, but that’s not very nice. Instead, we can help the user by redirecting them to the login page when they get the “Unauthorized” response. We can do this with a response override, like this:
// staticwebapp.config.json
{
  "routes": [
    {
      "route": "/*",
      "allowedRoles": ["authenticated"]
    }
  ],
  "responseOverrides": {
    "401": {
      "statusCode": 302,
      "redirect": "/.auth/login/aad"
    }
  }
}
Now if new users visits this awesome site without being logged in, they will get redirected to a login page for Azure AD. That looks much better.
Enterprise application appears
Usually when setting up authentication using Azure AD, you need to do app registrations, configure redirect paths, enable ID tokens and so on. Here it just magically works. Doesn’t that sound a bit fishy? That’s because some things happened in the background that is not entirely obvious.
Some time between deploying the config file and when the first user tried to log in, a new enterprise application was created in Azure AD. The enterprise application, which is called “Azure Static Web Apps”, cannot be renamed or removed once its created (it can be disabled).
The enterprise application is connected to the url https://identity.azurestaticapps.net which is used when a user authenticates to Azure Static Web Apps. Only one enterprise app is created for each tenant, which also means that all static web apps will be affected if the app is disabled, or changed in any other way.
So, if I want to give users permissions to my site, I just add them in “Users and groups” on the Enterprise Application? No, that is not what “free” taste like. For that, we need to look at the invitations system.
Invite users
We have authentication configured and now we want to give users permissions to log in to our site. To do this you need to invite users to the site. You can do this in Role management on the static web app. You click on the Invite button and fill in the email address and role. In the configuration above we added the built-in “authenticated” role to the rule, but for some reason you need to add a new role here, even if we are not going to use it in this scenario. When the form is filled in, click Generate and you will get an invite link which you can send to the user.
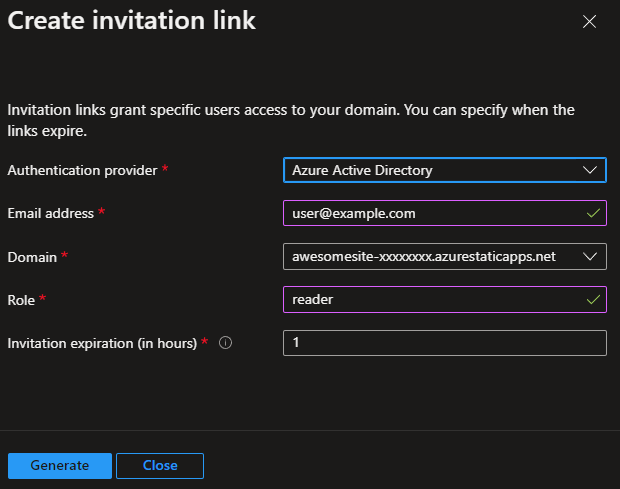
In the list of identities, you will not see your pending invitations. The user needs to use the link and login before the list gets populated.
User experience
When the user clicks on the invitation link, a login page appears. After login, the user gets presented with a consent page that looks different from other consent pages we usually see:
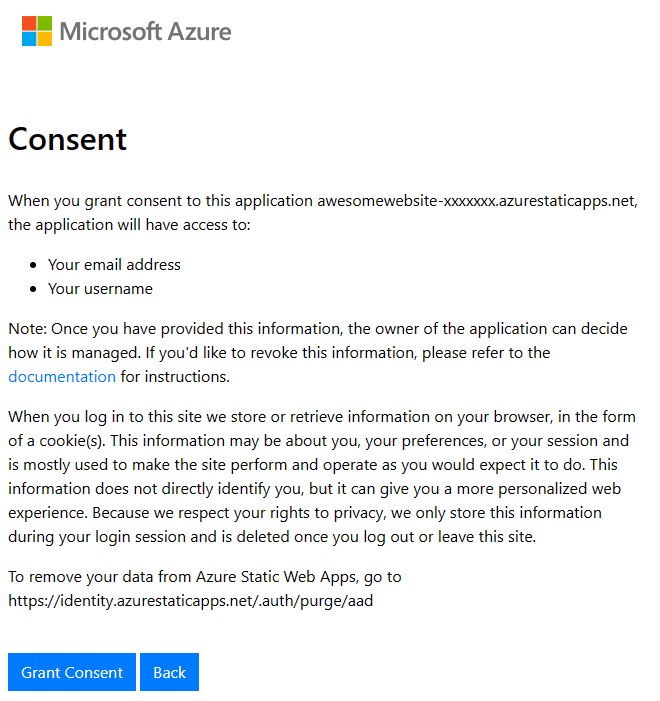
This consent page can not be disabled or altered. If you look at the url of the page, you will notice that its the same as we can see on the enterprise app (https://identity.azurestaticapps.net), so things are starting to make sense. One good thing with the consent page is that it mentions how you can purge your user data (by visiting https://identity.azurestaticapps.net/.auth/purge/aad), but I am not sure how many users till write that down when they see it.
We have now configured authentication and invited our first user.
Conclusion
Configuring built-in authentication requires minimal effort and is easy to use. It might not work for large enterprise projects. But smaller or hobby projects could be very suitable candidates. I haven’t mentioned that you can invite users to log in with accounts from GitHub or Twitter (Facebook and Google in preview). You can do all kinds of useful things with the staticwebapp.config.json file. Developers can deploy preview environments from their pull requests or branches. You can add your own custom domain instead of the auto-generated url. Why not add APIs with a function app? (but that’s not a static web app then, is it?)
And all of this is for free. I think thats pretty cool.
Set up built-in authentication for Azure Static Web App
This is the second part in a series covering Azure Static Web Apps. In the previous post I showed how to deploy a static web app. The web app was deployed successfully and open to the public to visit. What if you want to restrict access to the app to just a few users you trust? Azure Static Web Apps offers a couple of solutions without having to write a lot of code.
You can add authentication in two ways: built-in authentication and custom authentication. In this post I will focus on the built-in authentication. This is also the only way that works if you are running the free tier. Custom authentication requires the standard tier. I will go through custom authentication in a future post.
The baseline
I will continue on the site I deployed in the previous post. The site contained one html file which was located in the StaticWebApp folder. The deployment pipeline was configured to deploy anything in that folder. I will continue from there.
Configuration file
Its remarkably simple to add built-in authentication to a static web app. In the web app folder (in this case the StaticWebApp folder), add a file called staticwebapp.config.json and add the following content:
// staticwebapp.config.json
{
  "routes": [
    {
      "route": "/*",
      "allowedRoles": ["authenticated"]
    }
  ]
}
That’s it. Now let the pipeline will deploy the change and suddenly your site is protected with authentication. However, this configuration does not give the user the option to actually sign in. You could ask users to browse to https://yousite.com/.auth/login/aad and authenticate and then go back to the main site, but that’s not very nice. Instead, we can help the user by redirecting them to the login page when they get the “Unauthorized” response. We can do this with a response override, like this:
// staticwebapp.config.json
{
  "routes": [
    {
      "route": "/*",
      "allowedRoles": ["authenticated"]
    }
  ],
  "responseOverrides": {
    "401": {
      "statusCode": 302,
      "redirect": "/.auth/login/aad"
    }
  }
}
Now if new users visits this awesome site without being logged in, they will get redirected to a login page for Azure AD. That looks much better.
Enterprise application appears
Usually when setting up authentication using Azure AD, you need to do app registrations, configure redirect paths, enable ID tokens and so on. Here it just magically works. Doesn’t that sound a bit fishy? That’s because some things happened in the background that is not entirely obvious.
Some time between deploying the config file and when the first user tried to log in, a new enterprise application was created in Azure AD. The enterprise application, which is called “Azure Static Web Apps”, cannot be renamed or removed once its created (it can be disabled).
The enterprise application is connected to the url https://identity.azurestaticapps.net which is used when a user authenticates to Azure Static Web Apps. Only one enterprise app is created for each tenant, which also means that all static web apps will be affected if the app is disabled, or changed in any other way.
So, if I want to give users permissions to my site, I just add them in “Users and groups” on the Enterprise Application? No, that is not what “free” taste like. For that, we need to look at the invitations system.
Invite users
We have authentication configured and now we want to give users permissions to log in to our site. To do this you need to invite users to the site. You can do this in Role management on the static web app. You click on the Invite button and fill in the email address and role. In the configuration above we added the built-in “authenticated” role to the rule, but for some reason you need to add a new role here, even if we are not going to use it in this scenario. When the form is filled in, click Generate and you will get an invite link which you can send to the user.
In the list of identities, you will not see your pending invitations. The user needs to use the link and login before the list gets populated.
User experience
When the user clicks on the invitation link, a login page appears. After login, the user gets presented with a consent page that looks different from other consent pages we usually see:
This consent page can not be disabled or altered. If you look at the url of the page, you will notice that its the same as we can see on the enterprise app (https://identity.azurestaticapps.net), so things are starting to make sense. One good thing with the consent page is that it mentions how you can purge your user data (by visiting https://identity.azurestaticapps.net/.auth/purge/aad), but I am not sure how many users till write that down when they see it.
We have now configured authentication and invited our first user.
Conclusion
Configuring built-in authentication requires minimal effort and is easy to use. It might not work for large enterprise projects. But smaller or hobby projects could be very suitable candidates. I haven’t mentioned that you can invite users to log in with accounts from GitHub or Twitter (Facebook and Google in preview). You can do all kinds of useful things with the staticwebapp.config.json file. Developers can deploy preview environments from their pull requests or branches. You can add your own custom domain instead of the auto-generated url. Why not add APIs with a function app? (but that’s not a static web app then, is it?)
And all of this is for free. I think thats pretty cool.
- Written by John Roos on May 2, 2023